Neurapix

When you’re delivering hundreds or even thousands of images per job, efficiency becomes just as important as artistry. A smooth, consistent workflow saves you hours, preserves creative energy, and helps you deliver polished results faster. Adobe’s photography ecosystem — Lightroom Classic, Lightroom (cloud), Photoshop, Bridge, and Camera Raw (ACR) — is built precisely for that purpose. These applications work hand in hand, letting you cull, batch-edit, retouch, and export at scale without compromising on quality.
This guide focuses on the real-world needs of photographers who handle volume: culling, bulk adjustments, selective retouching, and professional delivery. Think weddings, family and children’s portraits, corporate events, couples, newborns, sports tournaments, and school picture days — not conceptual composites or design-heavy projects. The tone here is peer-to-peer: a seasoned colleague walking you through what actually works under the pressure of deadlines.
Lightroom Classic: the desktop workhorse
Lightroom Classic is the backbone of many professional photographers’ workflows. It organizes your images through a catalog — a database that tracks edits, ratings, and metadata — while your photos remain safely stored on your drives. It’s built for large libraries, repetitive tasks, and long-term archiving.
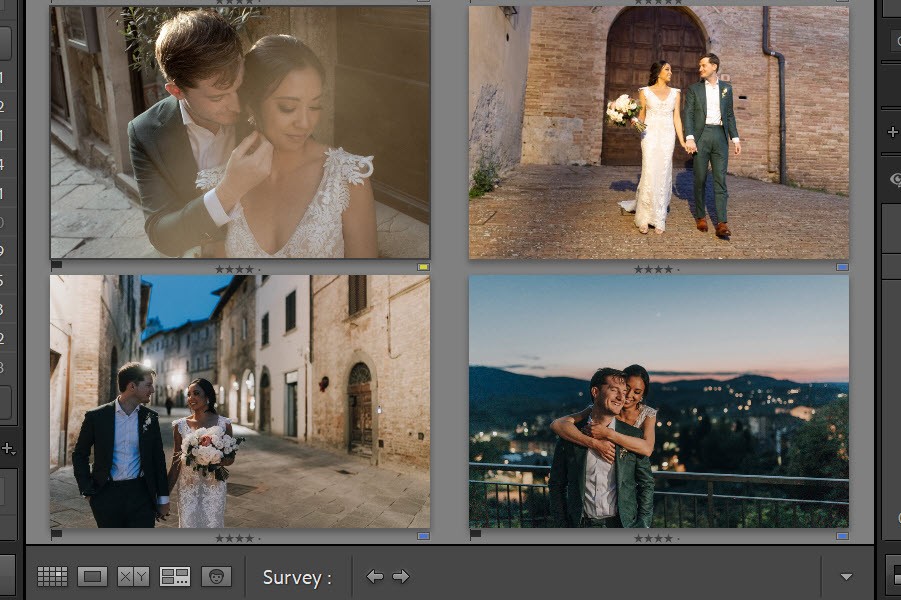
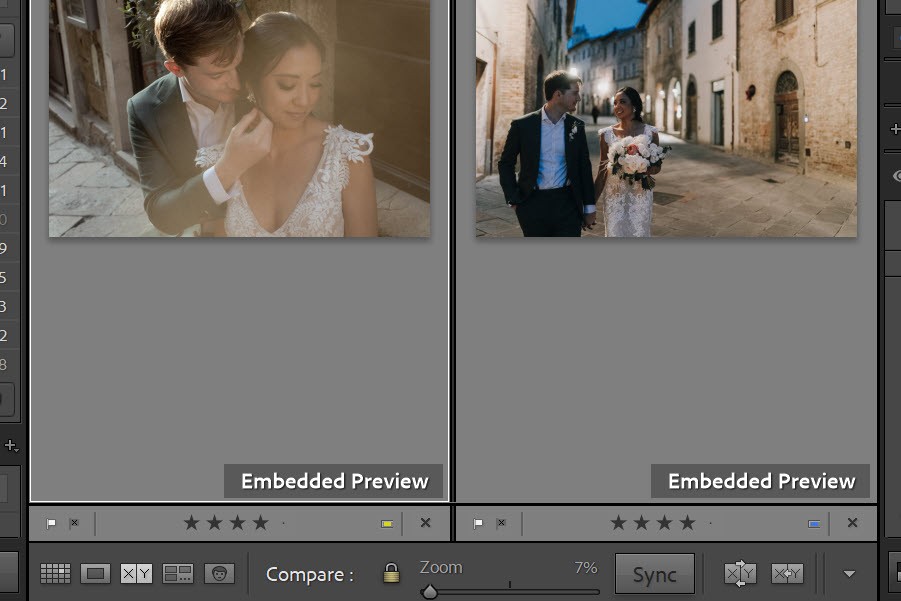
Flags, stars, color labels, Survey and Compare views, fast Loupe zooming, and Auto-Advance make culling thousands of frames manageable. You can filter by camera or lens to compare angles and quickly find the best action moment. Folders, Collections, and Smart Collections mirror your real-world structure — for example, 01-Prep, 02-Ceremony, 03-Portraits, or Album Picks. Hierarchical keywords (like People > Family > Child > Sibling A) and custom metadata keep sessions searchable for years.
Photos: Formaphotography
Photos: Formaphotography
You can also batch-edit entire sets — from weddings to newborn shoots — by copying or syncing adjustments across similar frames. Use Auto Sync for consistent exposure and color across sequences.
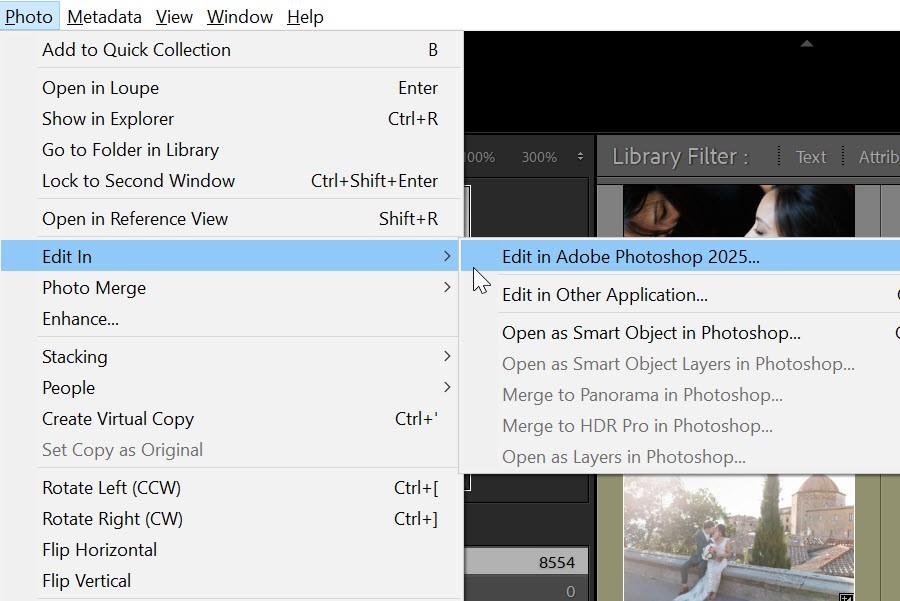
When deeper retouching is needed, choose Edit In > Photoshop. Lightroom automatically creates a TIFF or PSD copy with your RAW edits embedded. Once you save, the retouched version stacks automatically with the original, keeping your workflow organized and traceable from start to finish.
Photos: Formaphotography
Pro tips for Lightroom Classic
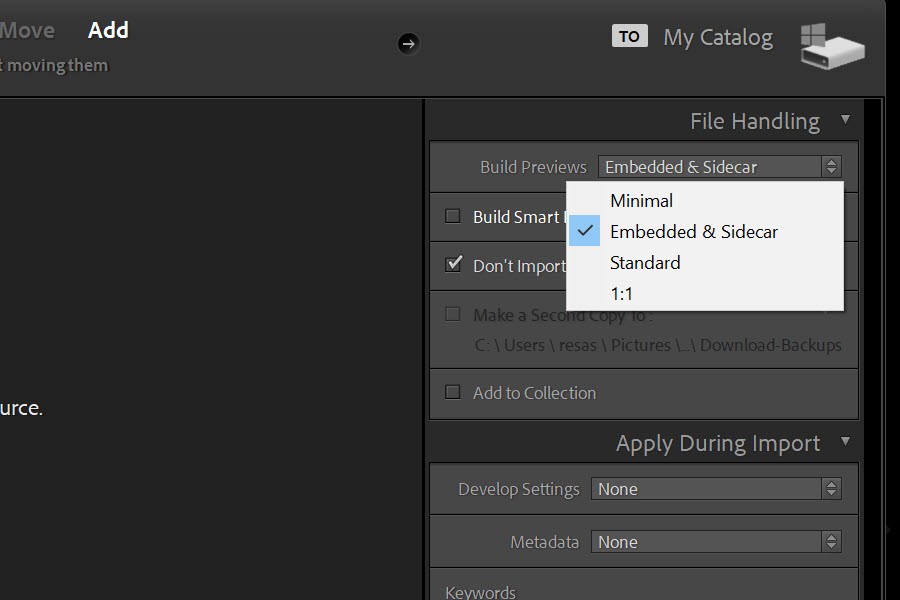
Preview strategy: If you need to start culling immediately, build Standard or 1:1 previews on import. When time is short, choose Embedded & Sidecar previews to begin sorting instantly, then let Lightroom generate full previews later.
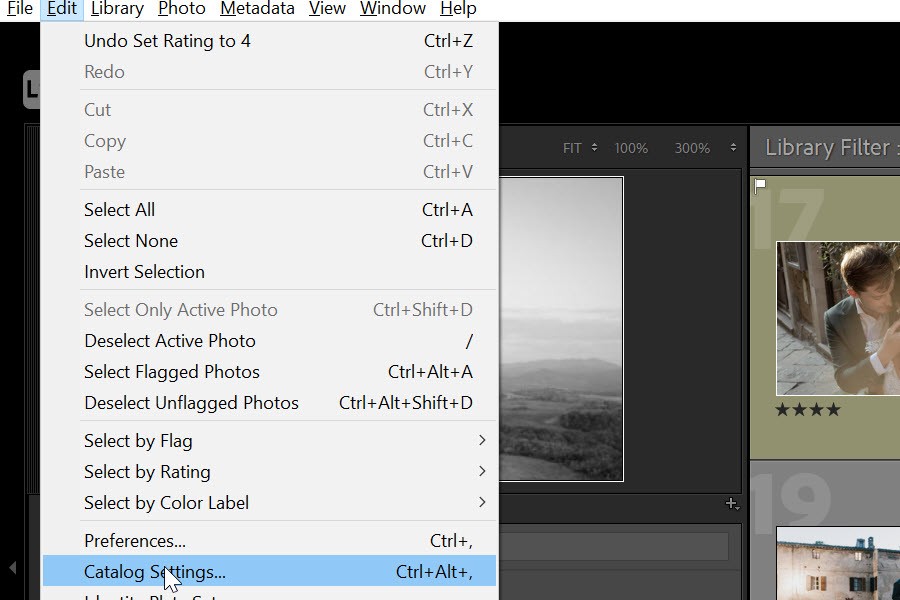
Catalog health: Keep your catalog and previews on a fast SSD, and store your active RAWs on a reliable NVMe or high-speed external drive. Regularly optimize the catalog and maintain rolling, verified backups to prevent slowdowns or corruption.
Photos: Formaphotography
Develop speed: Enable GPU acceleration for smoother performance (unless a specific driver causes instability). Use Auto Sync purposefully — selecting logical subsets — and apply adaptive presets for consistent looks across mixed lighting conditions. For even faster results, professional users can integrate Neurapix’s AI-assisted editing workflow
Smart Collections for deliverables: Create Smart Collections like Picks AND not Rejected, Has Color Label ‘Retouch’, or Rating ≥ 4 to automate tracking of your progress and output-ready selections.
Tether and studio use: Classic’s tethering is robust for headshot sessions, newborn photography, or controlled studio setups. Create on-import presets and metadata templates to streamline your process and ensure every shot enters your catalog perfectly labeled and adjusted.
Lightroom (cloud): editing anywhere
Lightroom (cloud) is built for photographers who want flexibility and simplicity without sacrificing editing power. It shares the same Camera Raw engine as Lightroom Classic but wraps it in a cleaner, more modern interface that emphasizes speed and mobility.
When you’re traveling or working across multiple devices, Lightroom (cloud) keeps everything synchronized. You can import a shoot on your laptop during an event, review and favorite images with a client on your iPad, and finish polishing a few selects on your phone before bed — every edit, rating, and adjustment stays in sync. The interface is deliberately minimal: fewer panels, no complex module switching, and a focus on what matters most — editing and sharing for fast client proofing.
Smart search and AI assistance
Lightroom’s intelligent search, powered by Adobe Sensei AI, automatically recognizes image content. You can type “bouquet,” “first dance,” “baby feet,” “trophy,” or “speaker on stage,” and it will find those moments instantly. This saves countless hours of manual keywording and turns the cloud version into a surprisingly capable photo library, despite its simplicity.
Understanding the trade-offs
Cloud storage, however, can become expensive with high-volume work. Large RAW files from weddings, sports tournaments, or multi-day events quickly consume available space. Be selective about what you sync as full originals and consider using Smart Previews for lighter storage.
Compared to Classic, Lightroom (cloud) offers fewer library and metadata controls — no Print module, limited metadata fields, and simplified tether options. Batch processing works well via copy-paste or multi-select edits, but Classic’s Auto Sync and Smart Collections still win for managing thousands of files efficiently.
When Lightroom (cloud) shines
Lightroom (cloud) suits frequent travel, tablet-based proofing, and a portable portfolio. In a hybrid setup, Lightroom Classic remains the long-term archive while Lightroom (cloud) handles active projects, client reviews, or on-the-go editing.
Ingest in Classic, flag selects, and export a smaller DNG subset into Lightroom (cloud) for proofing — or use Classic’s Sync to push Smart Previews of a chosen Collection. Shared cloud albums let clients favorite images and those marks sync to your Classic catalog. A small set of mobile-friendly presets helps produce social-ready teasers on the spot.
In short, Lightroom (cloud) delivers creative freedom wherever you are. It keeps your active projects accessible, your edits synchronized, and your workflow moving smoothly — while Lightroom Classic remains the anchor for your entire library.
Choosing between Lightroom Classic and Lightroom (cloud)
Lightroom Classic is the preferred choice if you regularly shoot large volumes — often hundreds or thousands of images per job. It’s designed for maintaining a long-term local archive with deep cataloging, reliable metadata control, and fast batch exports. You’ll appreciate the full control it gives over your file structures and local storage without depending on cloud bandwidth. Classic is also ideal for tethered sessions, studio workflows, and direct print output.
Lightroom (cloud), on the other hand, focuses on portability and simplicity. It’s built for smaller or more agile workflows, offering a clean, modern interface and automatic syncing across all your devices. Its AI-powered search replaces complex manual organization with intuitive image discovery, making it perfect for travel work, smaller shoots, and on-the-go client proofing or collaboration.
Many professionals combine both: Lightroom Classic serves as the master archive, while Lightroom (cloud) handles current projects and mobile proofing. Sync only Smart Previews or curated collections to the cloud to stay efficient, and once jobs are complete, archive the finals back into Classic or your long-term cold storage.
Photoshop: pixel-perfect finishing
Photoshop is where the most detailed, hands-on work happens. It’s not for processing thousands of images, but for enhancing the select few that matter most — the hero shots that define your gallery, print, or campaign.
Do 90–95% of your editing in Lightroom or Camera Raw: exposure, color, tone, and lens corrections are faster and more uniform there. Then send only your strongest frames to Photoshop for pixel-level refinement — removing distractions, smoothing fabrics, perfecting skin, or compositing elements.
From Lightroom Classic or Lightroom (cloud), choose Edit In > Photoshop to open a file with all your RAW adjustments intact. Once you’ve finished your work, hit Save — the edited image stacks automatically in your Lightroom library, keeping exports organized.
Smart techniques for advanced control
Smart Objects & ACR Filter: Open as a Smart Object when round-tripping from Lightroom so you can re-enter Adobe Camera Raw later and fine-tune exposure, white balance, or texture without redoing your edits.
Frequency separation: Use it gently for close-up portraits or beauty work. For portraits, keep tones consistent and natural.
Content-Aware Fill & Remove Tool: Clean up distractions fast — floor tape, exit signs, scuffs on backdrops, or sponsor banners at events.
Custom Actions: Automate repetitive steps like watermarking, sharpening, or output resizing, but let Lightroom handle bulk exports; Photoshop shines best at precision, not volume.
Layer discipline: Name and group your layers logically. Keep masks organized and non-destructive.
Not every frame needs Photoshop. Reserve it for the moments that truly benefit: intimate couple portraits, parent-and-newborn close-ups, a keynote speaker’s hero image, or the winning goal celebration.
A typical Photoshop micro-workflow looks like this: heal or clone out distractions (exit signs, floor tape, stray hairs), dodge and burn on 50% gray or Curves layers for depth and shape, apply Liquify lightly to fix distortions, fine-tune tones with Selective Color or Curves, and clean backgrounds using Content-Aware Fill or the Remove Tool. Save, and your edited file stacks automatically in Lightroom Classic, keeping your exports organized.
While Photoshop handles those artistic refinements, many photographers now speed up their Lightroom workflow with AI-assisted tools like Neurapix. According to ePHOTOzine it integrates seamlessly into Adobe Lightroom Classic, helping professionals batch-edit large sets with consistent quality and freeing up time for creative work in Photoshop.
Adobe Camera Raw (ACR): the engine under the hood
Adobe Camera Raw — ACR — is the RAW processor that powers both Lightroom and Photoshop. When you open a RAW file in Photoshop or Bridge, ACR appears automatically, giving you the same sliders, tonal controls, and color rendering as Lightroom’s Develop module. It’s the same engine — just a different doorway.
ACR is ideal when you’re working without a catalog or need quick adjustments directly from the file system. Open a folder in Bridge, select your images, and open them in ACR for tonal corrections, color tweaks, or batch edits.
Inside Photoshop, you can use the Camera Raw Filter to apply RAW-style adjustments to any layer or Smart Object. This allows non-destructive edits even on flattened images — a powerful bridge between RAW flexibility and pixel-level precision.
ACR shines in small or medium jobs, one-off edits, or collaborative projects where designers and photographers work together from shared drives. For large weddings or sports weekends, however, Lightroom Classic’s catalog and Smart Collections will always be faster for managing thousands of files.
Batching in ACR
Select multiple files in Bridge and choose Open in Camera Raw.
Adjust one image, then select all and click Sync Settings to apply your changes.
Choose Done to save the settings to XMP or Open to continue into Photoshop.
Use Save from within ACR if you need quick JPEG or TIFF outputs without launching Photoshop.
Bridge: catalog-free control
Adobe Bridge is your all-purpose file browser and digital asset manager — perfect when you want full visibility of your folders without committing them to a Lightroom catalog. It shows thumbnails and metadata instantly, lets you rate, label, keyword, and rename files, and integrates tightly with both Photoshop and Adobe Camera Raw.
Bridge is a great first stop for photographers who prefer manual control. You can review RAWs straight off the card, apply star ratings or color labels, and even batch-rename files before import. Those ratings and labels are saved as XMP metadata, so if you later bring the same files into Lightroom Classic, your culling decisions come with them.
Metadata and batch operations
Bridge excels at metadata management — letting you quickly add copyright and IPTC data to hundreds of files at once. Batch renaming and processing are just as easy: rename large sets, convert formats, or run Photoshop Actions through the Image Processor. Bridge streamlines repetitive prep steps before deeper editing.
Bridge doesn’t edit images itself; instead, it works in tandem with Camera Raw and Photoshop. Double-click a RAW file, and ACR launches automatically for tonal and color corrections. This setup makes Bridge an efficient companion even if you spend most of your editing life inside Lightroom.
Putting it together: a fast, real-world workflow (1,500-image wedding)
This same framework adapts beautifully to other high-volume scenarios — from family and newborn sessions to sports tournaments or multi-speaker corporate events.
Step 1: ingest and culling
Option A — classic-centric (fastest for most)
Import all images into Lightroom Classic, copying them into a clear folder structure such as YYYY/YYYY-MM-DD_ClientName/01_RAW/.
Use flags or star ratings with Auto-Advance to move quickly through the set, reject weak shots, and promote 4- and 5-star keepers into a Picks Collection. For near-duplicates like the first kiss or bouquet toss, use Survey view for instant side-by-side comparison.
Photos: Formaphotography
Option B — bridge-first (when time is tight or you prefer skipping throwaways)
If time is short, open the card directly in Bridge, review full-screen with the spacebar, rate your selects, and optionally batch-rename them right away. Then import only the selected files into Lightroom Classic for editing and delivery. This keeps your catalog lean, though you’ll lose the reject record — sometimes useful if clients later request alternate angles.
For tournaments, start culling by team or athlete using color labels per team, then refine by key action moments. For conferences or corporate events, sort by speaker or session, filtering by capture time and camera or lens to group images efficiently.
Step 2: batch editing (global corrections)
In Lightroom Classic’s Develop module, start with a representative image from each lighting scenario — outdoor shade, golden hour, tungsten speeches, or studio strobes. Set white balance, exposure, contrast, and lens corrections, and apply noise reduction for high-ISO shots.
Save scene-specific presets like Reception DJ Lights Base for reuse. Use Auto Sync for global adjustments and rely on AI masks (Subject, Sky, Background) to balance faces and environments efficiently. For family or newborn sets, keep color grading gentle to preserve natural skin tones.
If you work catalog-free, the Bridge + ACR route offers the same flexibility: open a batch in ACR, adjust one photo, sync settings across all, and click Done to write edits to XMP. It’s ideal for small teams or designers who need quick, consistent exposure and tone corrections before layout.
Step 3: selective retouching (Photoshop)
Not every image deserves a deep dive — reserve Photoshop for the select few that truly benefit, such as couple portraits, newborn close-ups, keynote hero shots, or team celebrations. From Lightroom Classic, choose Edit In > Photoshop (or open as a Smart Object if you may refine RAW settings later).
A focused Photoshop workflow includes healing or cloning distractions like exit signs or stray hairs, dodging and burning on 50 % gray or Curve layers for depth, gentle Liquify for minor distortions, color finesse with Selective Color or Curves, and background cleanup via Content-Aware Fill or the Remove Tool. When finished, simply save — Lightroom stacks the retouched file with the original, keeping your export workflow intact.
Step 4: Export and delivery presets
Full-resolution JPEG (Quality 92–100, sRGB for most clients, Adobe RGB or ProPhoto RGB if required by your print lab).
Web version at 2048 px on the long edge (around Quality 80, sharpened for screen).
Social-media set at 1080 px for quick sharing.
Print-ready TIFF for album design.
Apply watermarks to web and social sets but omit them from master files unless specifically requested. Use consistent naming such as Client_Event_####.jpg, and for sports or school work, append jersey numbers or team codes to make client searches easier.
Step 5: archive and handoff
Write metadata to files or XMP sidecars (Cmd/Ctrl + S) so edits stay portable across systems. Back up to a primary drive plus offsite/NAS/RAID with versioning for safety. When collaborating remotely with a retoucher or album designer, export a catalog containing Smart Previews of your selected images.
Quick setup and performance tips
When working with thousands of images, your system’s performance can make or break your workflow. Investing in a fast, stable setup isn’t a luxury — it’s essential for consistent, stress-free post-production.
Hardware matters
Keep your Lightroom catalog and previews on a fast SSD, and store active RAWs on an NVMe drive for optimal performance. For wedding and event work, 32 GB of RAM is a comfortable baseline, while 64 GB gives Lightroom and Photoshop enough headroom to run side by side without lag. Enable GPU acceleration — unless you experience instability with specific drivers — to speed up rendering, AI masks, and brush performance.
Catalog hygiene and preview strategy
Stick to one main catalog per year or business unit to keep things organized and efficient. Keep the catalog and previews on a fast SSD, and back them up regularly to a separate drive or cloud destination with automatic verification.
Build only the previews you actually need — Standard or 1:1 for detailed culling, or Embedded & Sidecar when time is tight — and set them to discard automatically after 30 days to reclaim disk space once client deliveries are complete. Run Optimize Catalog after large imports or heavy culling sessions to keep Lightroom Classic responsive and stable.
Presets, templates and color management
Create import presets for lens corrections and base tone curves; export presets for full-resolution, web, and social output; metadata presets for copyright and contact details; and file-naming templates for consistent structure. Use adaptive or AI-based masks sparingly within presets — they can ensure consistent exposure and skin tones, but subtlety keeps the look natural.
Calibrate your monitor regularly and maintain a consistent working color space. sRGB covers most client and web delivery needs, while Adobe RGB or ProPhoto RGB are better for fine-art and print lab work. Use soft proofing in Lightroom or Photoshop for album spreads, brand imagery, and any color-critical projects.
File naming and storage tiers
Use clear, professional names such as CLIENT_YYYYMMDD_####.ext. For schools and sports, append class names, athlete IDs, or team codes to make files searchable.
Organize storage into three tiers:
Hot storage (active jobs): internal SSD or NVMe.
Warm storage (current season): RAID or NAS with a fast 2.5 or 10 GbE network.
Cold storage (archives): large HDD arrays or cloud cold storage.
Keep three copies of everything — one local, one on-site backup, and one off-site — to protect your livelihood from drive failures or data loss.
Tethering and studio setups
For studio photographers, create watched folders or tether presets that apply basic edits in real time. Lightroom can automatically apply contrast, crop, or skin-tone corrections as you shoot, giving clients polished previews during the session and keeping you efficient on set.
Cheat sheet and extra tips for your photography niches
Quick reminder of which Adobe tool fits which task:
Fastest culling of large sets: Lightroom Classic (with built previews) or Bridge (for zero-import browsing).
Bulk edits with consistent results: Lightroom Classic (Auto Sync or synced settings) or ACR (Sync Settings for smaller batches).
Deep retouching: Photoshop (layers, masks, Content-Aware Fill, Liquify).
On-the-go edits and sharing: Lightroom (cloud).
Metadata and batch renaming: Bridge.
RAW editing engine across apps: ACR (inside Lightroom, Photoshop, and Bridge).
Tailoring workflows to your photography niche
Weddings and couples: Build lighting-scene presets across the season — tungsten-lit ceremonies, backlit summer evenings, LED receptions. Use AI Select Subject to brighten faces under DJ lights, and apply a gentle, consistent tone curve for cohesion.
Families and children: Keep edits natural and timeless. Parents appreciate authentic tones and clean skin over heavy smoothing. Flag your “album moments” — genuine laughter, hugs, and emotion — for light Photoshop refinement only.
Newborn and baby sessions: Maintain soft, realistic textures and subtle colors. Watch for red or magenta casts on delicate skin, and use frequency separation sparingly to retain natural detail.
Sports: Sync clarity, texture, and contrast across sequences to keep a consistent punch. Crop to the aspect ratio your proofing or sales platform expects. Include team or player numbers in filenames so parents can find their athlete.
Business and corporate: Consistency is everything. Batch-apply matching white balance and background cleanup across headshots. Keep a retouch checklist — glare on glasses, collar alignment, lint removal — to maintain a consistent, polished look.
By fine-tuning your workflow per niche, you’ll increase both speed and client satisfaction while maintaining a consistent visual signature across every project.
Troubleshooting and pitfalls to avoid
Mixed lighting can be tricky. Create separate subsets for DJ lights, ambient light, and daylight, then sync settings within each group. Adjust color grading per subset rather than applying one universal look. If Lightroom (cloud) warns that storage space is running low, pause syncing and move finished projects back to Lightroom Classic, or export them as DNG Smart Previews instead of full RAW files to save space.
When Lightroom Classic slows down, check your GPU settings, preview size, and cache location. Keep both the catalog and previews on an SSD, and avoid storing catalogs on network drives to maintain speed. To prevent duplicate files or edits, rely on one master source — your Lightroom Classic catalog — for all ratings and labels. If you’re collaborating, export a Catalog with Smart Previews rather than sending loose folders.
Finally, watch for unexpected color shifts online. Always export in sRGB unless a specific platform requests a different profile, and never strip embedded profiles unless you’re certain how the platform handles color management.
Final thoughts
For most high-volume photographers — whether shooting weddings, families, children, events, couples, newborns, or sports — the winning combination remains Lightroom Classic + Photoshop. Lightroom Classic handles the heavy lifting: ingestion, organization, fast culling, batch editing, and export. Photoshop takes over when precision matters — the final 5–10% that transforms great images into portfolio pieces.
Lightroom (cloud) earns its place for portability and live collaboration — proofing on an iPad, quick social-ready exports, or working on the road. Bridge remains your flexible tool for browsing, quick metadata edits, and batch renaming. And Camera Raw quietly powers them all, ensuring consistent color and tone across every app. Use each tool at its best stage in the process and your workflow becomes faster, calmer, and more reliable. You’ll spend less time wrestling with files — and more time creating photographs your clients will treasure and proudly share.


Neurapix is a German startup based in Göttingen. Founded in 2021, the company has developed an artificial intelligence that learns individual editing styles and applies them directly within Adobe Lightroom. This allows photographers to edit large volumes of photos in their personal style in a fraction of the time—saving them hours of work.

Start with 1,000 free AI edits.
Copyright © 2026 Neurapix GmbH. All rights reserved.