Neurapix

Photography is often described as the art of freezing a moment in time — but the truly memorable images go far beyond that. They don’t just show us what happened; they invite us to feel the pulse of the scene. Whether it’s the pulse of a packed dance floor, the quiet intimacy of a stolen glance between newlyweds, or the unrestrained laughter of children at a birthday party, the challenge for the photographer is the same: to capture the mood as vividly as the moment.
For wedding photography, family photography, and event photography, this means moving beyond purely static, pin-sharp frames. While those have their place — and clients will always appreciate a clean, classic portrait — they don’t always convey the energy and atmosphere that make the day unforgettable. That’s where in-camera effects step in, as described in the article on creative in-camera effects. These are creative photography techniques executed entirely on location, using the camera and available tools rather than relying on heavy post-production later.
By integrating in-camera effects into your work, you give yourself a wider creative vocabulary. You can respond to the rhythm of an event in real time, choosing whether to infuse a shot with dynamic motion blur, to frame it through reflections for a layered storytelling feel, or to add a dreamy haze that softens reality into something almost cinematic. And when you use these techniques intentionally — not as gimmicks, but as storytelling devices — they can transform your galleries into immersive experiences that your clients will treasure.
Slow shutter magic – motion blur and light trails
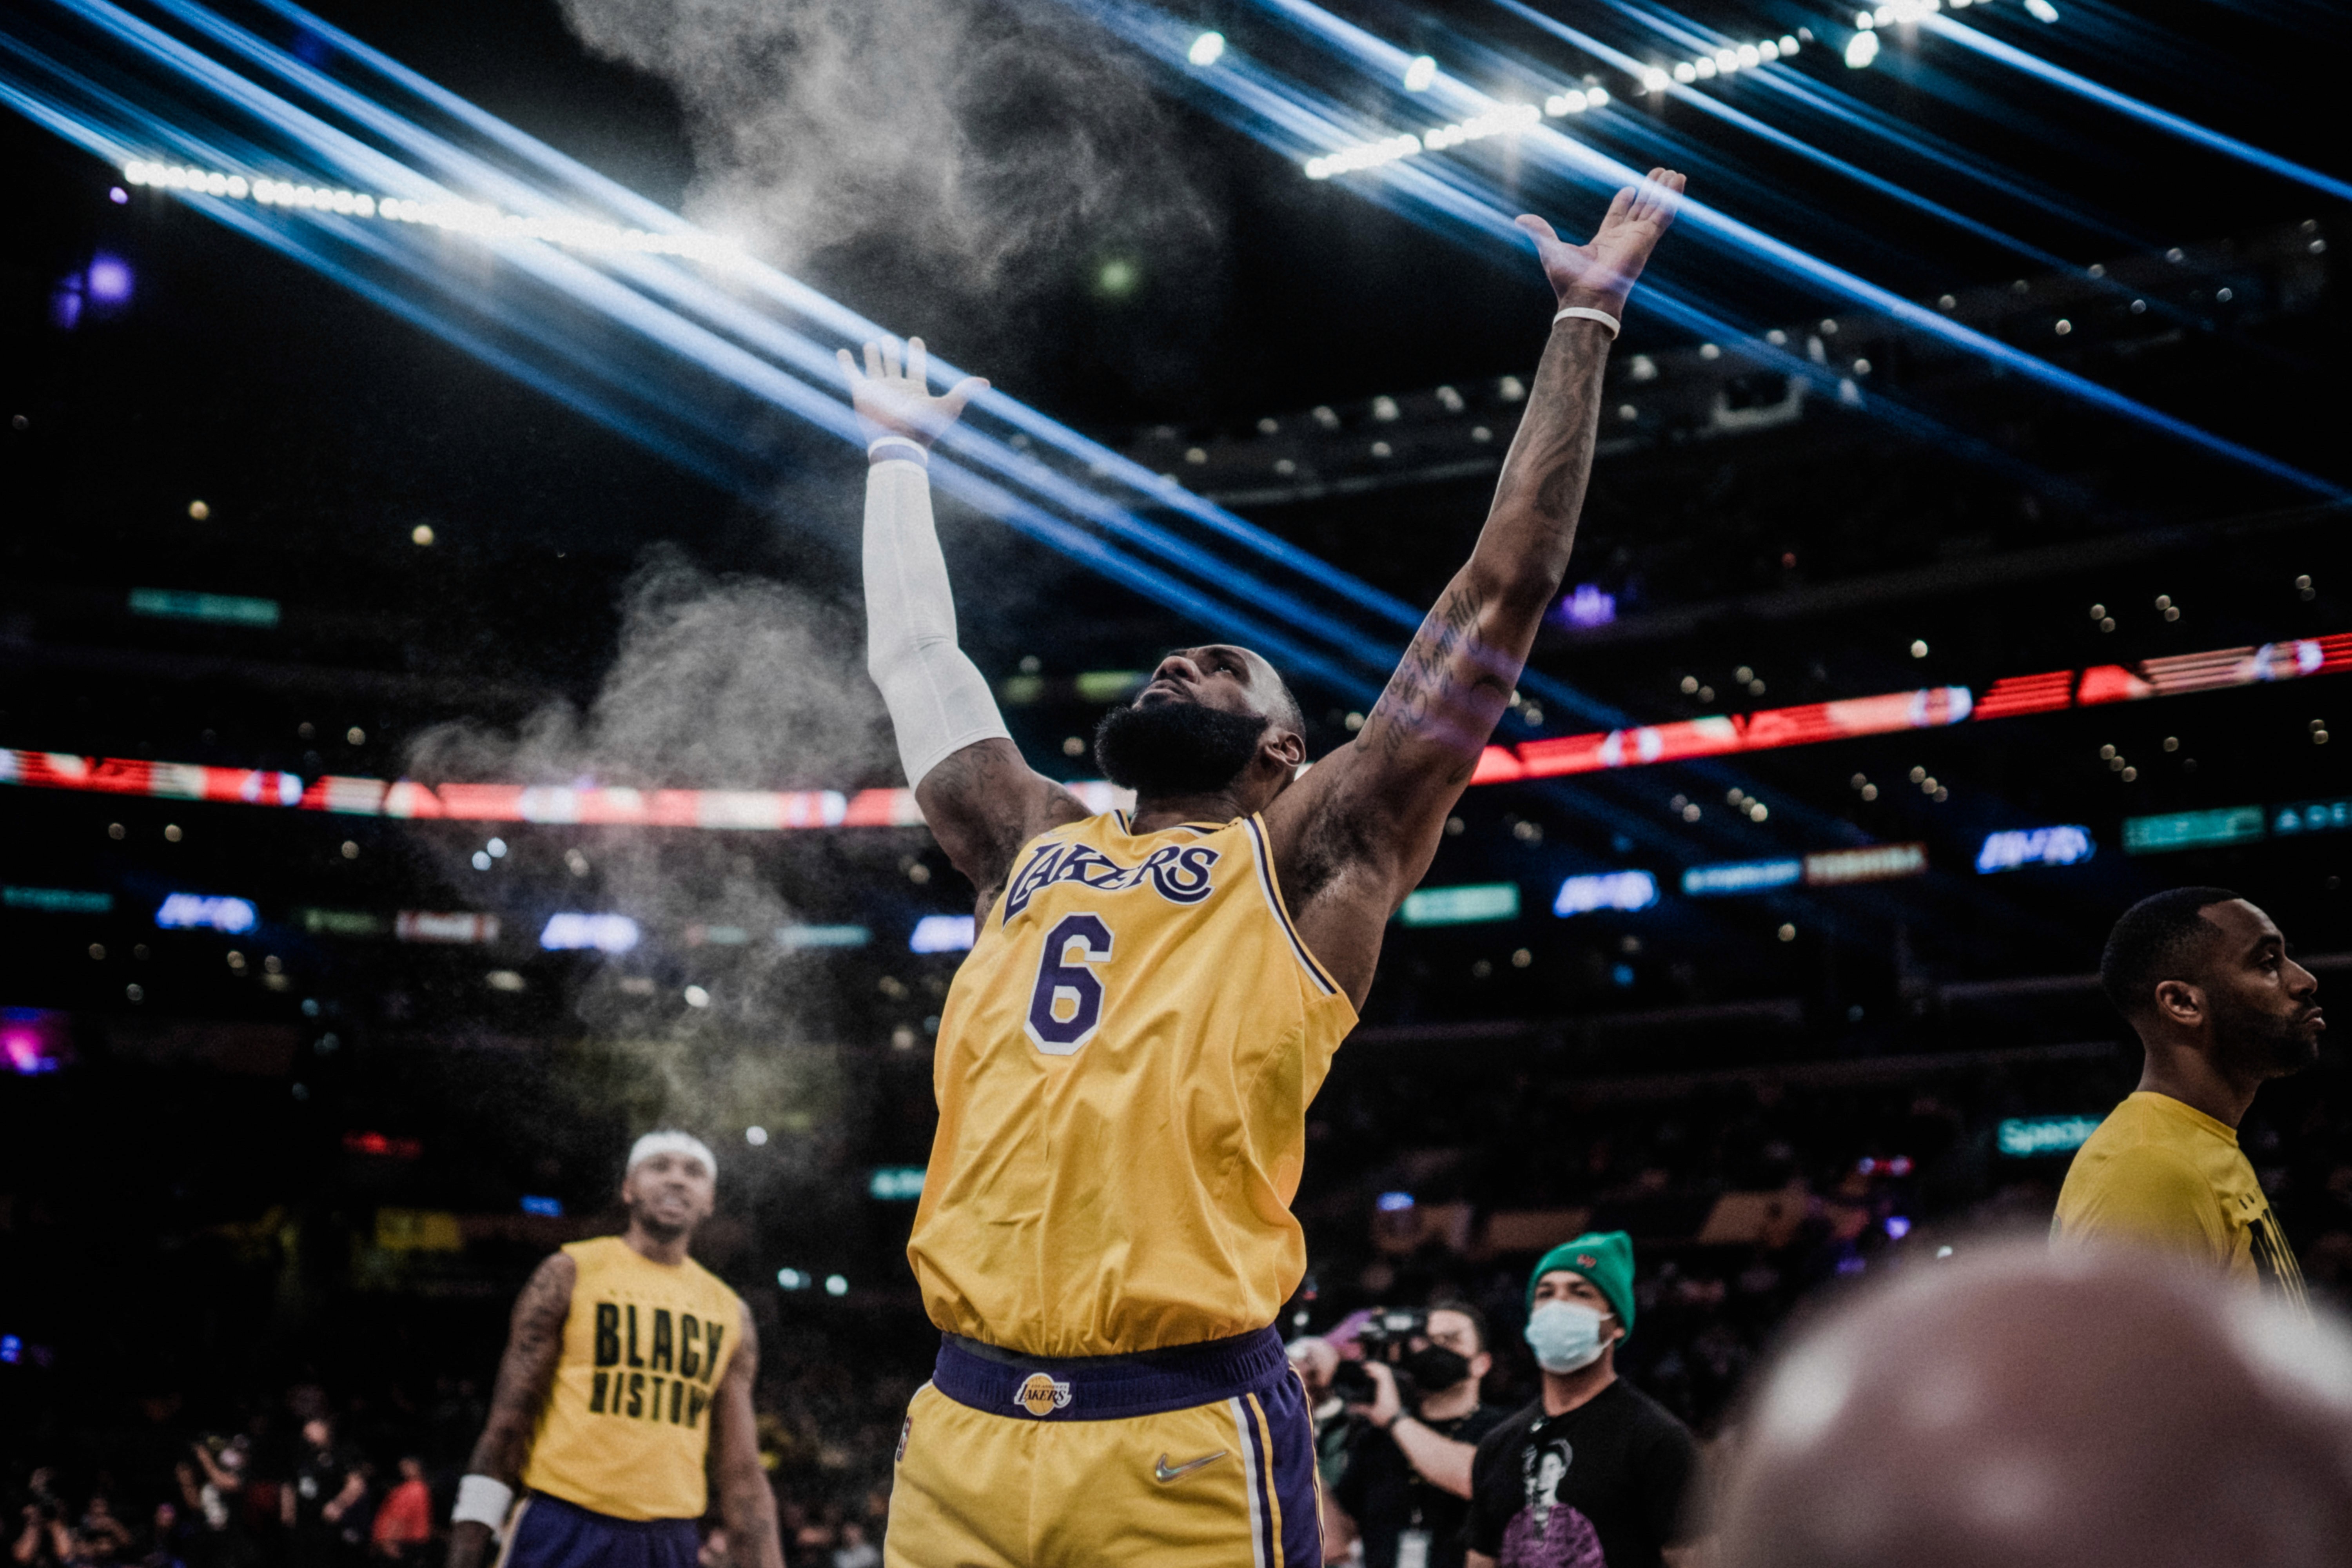
There’s a reason “slow shutter magic” is a favorite among creative wedding and event photographers: it’s one of the simplest and most effective ways to inject a sense of movement into still imagery. Also known as “shutter drag” or “slow sync flash,” this technique marries two seemingly opposite elements — motion blur and crisp, frozen detail — into a single frame.
Imagine the scene: the band is playing a high-energy track, the bride and groom are spinning each other across the floor, and colored lights are sweeping through the room. With a standard fast shutter speed, you’d freeze the action completely. The result? A technically correct but somewhat lifeless image. Switch to a slower shutter speed combined with flash, and suddenly the image moves. The flash freezes your couple sharply, but the ambient lights smear into vibrant streaks around them, amplifying the feeling that the party is alive.
The practical setup is straightforward. Set your aperture to around f/11–f/16 to keep light trails defined, start with a shutter speed of about 1/6 second — slow enough to let in ambient light but fast enough to retain control — and an ISO of roughly 800 often balances well in dim indoor spaces. Use a front-curtain sync flash so the subject is frozen at the start of the exposure, leaving the rest of the shutter time to capture movement.
Technique matters here. A subtle camera twist during the exposure can create a halo of swirling light around your subject. A slow pan can convey the direction of their movement. And because ambient light sources vary dramatically between venues — from warm fairy lights to neon dance floor LEDs — it’s worth experimenting during quieter moments to fine-tune your approach. With practice, you’ll learn how much motion to allow without losing the clarity of your subject, and you’ll develop an instinct for when a scene will benefit from this extra visual energy.
This isn’t just for receptions. Sparkler exits, outdoor night portraits, or even a couple walking hand in hand under streetlights can all be transformed with a well-executed slow shutter effect. In each case, you’re not just taking a photo — you’re painting with the available light, making the moment feel just as electric as it did in person.

Photo: Formaphotography
Direct flash – bold, trendy looks from the 90s
Direct flash is one of those techniques that many photographers avoid early in their careers — perhaps because they associate it with the harsh, unflattering look of a basic point-and-shoot camera. But in recent years, it has staged a dramatic comeback in wedding photography, event photography, and even in editorial shoots. Used intentionally, direct flash can produce images that feel bold, modern, and full of attitude.
Picture the reception in full swing: guests are laughing, cocktails in hand, and the dance floor is pulsing with music. With soft bounced light, you can capture gentle, flattering portraits — but sometimes, that’s not the mood you want. Direct flash gives you something entirely different: high contrast, crisp shadows, and a sense of immediacy, almost like a paparazzi shot from the 1990s. It’s raw, authentic, and a little bit rebellious — perfect for capturing the unpolished energy of a party.
The appeal of this creative photography technique lies in its ability to strip away distractions. Because the light falls sharply on your subject, backgrounds often fade into darkness or blur into irrelevance, making the people in front of your lens the clear focal point of the image. It’s a technique that works especially well for guest portraits on the dance floor, candid moments at photo booths, or late-night celebration shots when the mood is loose and playful.
While the setup is simple — point the flash straight at your subject, usually at or near eye level — the key is in the intention. If you’re going for that vintage disposable-camera look, keep the light hard and direct. If you want to soften the edges while retaining that pop, you can use a small diffuser, like a MagSphere, which spreads the light slightly without losing the characteristic shadows that make the style so distinctive.
Camera settings will depend on the environment, but a good starting point might be 1/200–1/250 second at ISO 100–400 with an aperture of f/4 to f/8. Adjust your flash power to taste — often between 1/4 and 1/2 works well. And remember, you can blend direct flash with other in-camera effects. Pair it with a slow shutter, for example, and you’ll get the crisp, frozen subject surrounded by streaks of ambient light — a gritty, editorial-style image that tells a layered story.
Direct flash isn’t for every part of the day, but when used at the right moment, it’s a crowd-pleaser. Clients often react with delight when they see these unexpected, magazine-like shots mixed in with the more traditional ones. It’s proof that your job isn’t just to document, but to interpret — and sometimes, that means daring to break the rules.
DIY filters and on-the-go hacks
One of the joys of creative photography techniques is discovering that you don’t always need a studio full of gear to produce captivating effects. Sometimes, the magic comes from the simplest tools — everyday items you can slip into your pocket or find right there at the venue. These improvised methods are perfect for moments when you want to explore your creativity on the spot, adapt to an unexpected setting, or simply give your images a fresh visual twist.
Think about it: you’re at a wedding, waiting for the ceremony to start, and you notice the lace pattern of the bride’s veil catching the light in a beautiful way. Instead of photographing it in isolation, you bring it into your frame, letting it partially cover the lens so that its texture gently overlays the scene. The result? A portrait that’s both personal and artistic, infused with the defining details of the day.
The same principle applies to using a scrap of colored cellophane to shift the mood of an image, perhaps casting a warm, golden tone over a first dance, or a cool, moody blue over a quiet, romantic moment. A small hand mirror or even the reflective surface of a smartphone can serve as a tool for introducing layered reflections — multiplying fairy lights, refracting architectural details, or framing your subjects in a subtle halo.
Some effects are fleeting, which makes them all the more special. On a chilly evening, a gentle breath across the lens can create a temporary fog, softening the edges of the frame and evoking a dreamy, cinematic atmosphere. More adventurous photographers might experiment with freelensing — deliberately unmounting the lens slightly to let in light leaks and create an unpredictable blur evoking the look of vintage film cameras. It’s not a technique to use lightly, and it demands both practice and caution, but when mastered, it can produce images that feel truly one-of-a-kind.
These in-camera effects are not about replacing your standard shooting style; they’re about adding layers to your storytelling photography. They invite you to interact with the scene, to respond in real time to what’s in front of you, and to transform ordinary settings into something magical. And because they’re quick to set up and adapt, they’re perfect for those in-between moments during a wedding day or event, when you have a few seconds to try something unexpected without disrupting the flow.
The key is to remain mindful of your subjects. Effects should enhance their presence in the frame, not overwhelm it. By practicing these techniques before the big day, you’ll learn how to strike that balance, ensuring that your improvisation complements rather than distracts from the story you’re telling.
Best practices for in-camera effects
The beauty of in-camera effects lies in their immediacy — you see the magic happen right there, in the moment. But that immediacy comes with a responsibility: knowing when and how to use them so they elevate your narrative rather than distract from it. The most compelling effects feel organic to the scene; they blend seamlessly into the narrative you’re creating rather than pulling attention away from your subjects.
One of the most important habits you can develop is letting the moment lead the technique. For example, if the wedding dance floor is in full swing, slow shutter magic can amplify the joy and movement in the air. But if you’re capturing the quiet exchange of vows, the same technique might feel jarring or out of place. By tuning into the emotional rhythm of the event, you’ll know instinctively when an effect will enhance the story — and when it’s better to keep things simple.
Preparation is equally essential. While many of these creative photography techniques can be improvised, practicing them beforehand gives you confidence and control. Test them during personal projects, at styled shoots, or even while photographing friends. That way, when the perfect moment arises on a real job, you’ll be ready to execute without hesitation.
There’s also a safety net to consider: for every creative shot you take, capture a clean, effect-free version as well. This ensures your clients have timeless images to choose from, and it protects you if an experiment doesn’t quite land. It’s a habit that seasoned professionals swear by — one that keeps your clients’ needs at the heart of your creative process.
Checking your results throughout the day is another underrated best practice. Lighting changes, and so does your environment. What worked perfectly at the start of the reception might need a slight tweak once the sun has set or the DJ’s lights have shifted color. A quick glance at the back of your camera every now and then allows you to adapt on the fly, keeping your creative output consistent and intentional.
Finally, always remember that effects are a frame for your subject, not a replacement for it. The couple’s expressions, the embrace between family members, or the spark in a child’s eyes — these are the emotional anchors of your work. No matter how striking the effect, it should serve to enhance these moments, never obscure them.
A note on workflow efficiency
In-camera effects often lead to larger, more varied image sets — which means more time spent editing. If you want to maintain a consistent style without significantly increasing your post-production time, a tool like Neurapix can be useful. It applies your own editing style automatically in Lightroom Classic, speeding up turnaround while keeping your creative signature intact.
And the workflow gets even smoother with Neurapix’s new Culling (Beta) feature — a built-in image selection tool that lets you stay inside Lightroom, quickly flag, rate or color-label your photos, and even sort them using AI-assisted groupings like "smiles" or "eyes open" — features highlighted in DIY Photography’s coverage of this powerful addition.
Final thoughts
Mastering in-camera effects is about more than adding visual tricks to your repertoire. It’s about deepening your ability to tell stories through images, responding intuitively to the atmosphere of the moment, and giving your clients photographs that feel as alive as the day itself.
Used thoughtfully, these techniques can transform a straightforward record of an event into a compelling visual narrative. They provide variety, inject emotion, and create a richer viewing experience — while keeping you engaged creatively during the shoot.
The key is balance. Effects should enhance your subjects, not overshadow them. With practice, preparation, and a clear sense of intention, you can incorporate these tools seamlessly into your workflow, ensuring that each image contributes to the story you’re telling.
In the end, whether it’s the swirl of lights behind a first dance, the sharp energy of a direct-flash portrait, or the soft haze of a veil-draped lens, the real magic lies in your ability to match the right technique to the right moment — and in doing so, make your photography not just a record of events, but an experience in its own right.


Neurapix is a German startup based in Göttingen. Founded in 2021, the company has developed an artificial intelligence that learns individual editing styles and applies them directly within Adobe Lightroom. This allows photographers to edit large volumes of photos in their personal style in a fraction of the time—saving them hours of work.

Start with 1,000 free AI edits.
Copyright © 2026 Neurapix GmbH. All rights reserved.